
Instruction manual for filling and sealing machine
OFFICIAL DOCUMENTATION
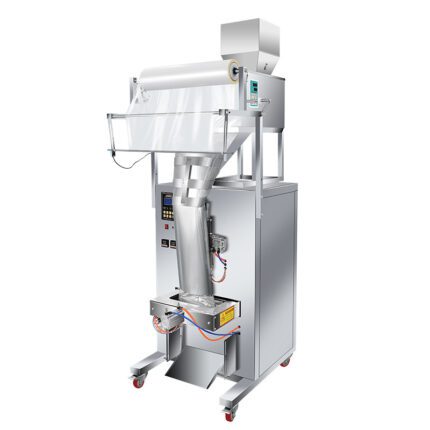
POWDER FILLING MACHINE ARL200,500, 1000G GRAMS
USER MANUAL
Technical Support and Warranty Certificate — NEED HELP? CONTACT US!
Do you have questions about the product? Do you need technical support? Don't hesitate to contact us at
www.distribucionarc.com/contacto.
This is the original instruction. Please read all instructions in the manual carefully before operating.
ARC Distribution reserves the right to interpret our user manual clearly.
The appearance of the product will be subject to the product received.
Technology or software updates may occur without prior notice.


MODEL
ARL-200, ARL-1000
This is the original instruction. Please read all instructions in the manual carefully before operating. ARC Distribution reserves the right to interpret our user manual clearly. Product appearance will be subject to the actual product received. Technology or software updates may be made without prior notice.
⚠️ WARNING
WARNING = WARNING
Please read carefully and understand all ASSEMBLY AND OPERATING INSTRUCTIONS before operating. Failure to follow safety rules and other precautions may result in serious personal injury.
GENERAL SAFETY RULES
Important reminder
- Before use, read the manual carefully and follow all safety warnings.
- Do not use this product for purposes not designated.
- Please observe applicable age and usage restrictions.
- If there is any abnormality, stop using it and contact after-sales service.
Environmental requirements for use
- Operate in a dry, ventilated environment; avoid water, high temperatures, humidity, or extreme cold.
- Avoid direct sunlight or fire sources.
- Use on a stable surface; avoid bumps or drops.
Safe Operating Guidelines
- Use the correct power supply and voltage; do not use damaged cords/plugs.
- Do not short circuit or connect incompatible devices.
- If there are foreign objects, stop use and remove them before continuing.
- During prolonged use, take a rest to avoid fatigue.
- Do not connect/disconnect with wet hands.
Maintenance and care
- Unplug before cleaning. Wipe with a dry cloth. Do not use alcohol or acid/alkaline solutions.
- If not used for a long time, unplug to save energy and prolong life.
- Do not disassemble or replace parts yourself; contact after-sales service if there are any problems.
Emergency management measures
- If overheating, smoke, or abnormal noises occur, cut off the power and contact after-sales.
- If there is a risk to personal safety, call emergency services.
SAVE THESE INSTRUCTIONS
MODEL AND PARAMETERS
| Parameter | ARL-200 | ARL-1000 |
|---|---|---|
| Suitable particle | Granular and powdery materials. Not floury materials, smooth-surfaced particles | Granular and powdery materials. Not floury materials, smooth-surfaced particles |
| Particle size | Φ < 5 mm | Φ < 5 mm |
| Filling range | 1–200 g | 1–1000 g |
| Voltage | AC 220/110 V 60 Hz | AC 230/110 V 50 Hz |
| Power (max.) | 550 W | 950 W |
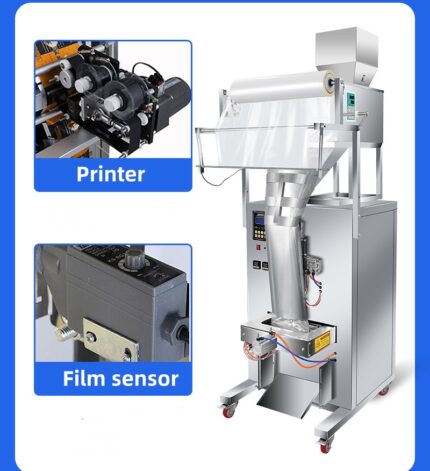
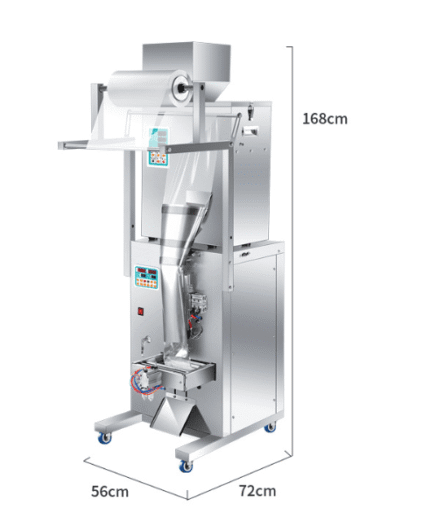
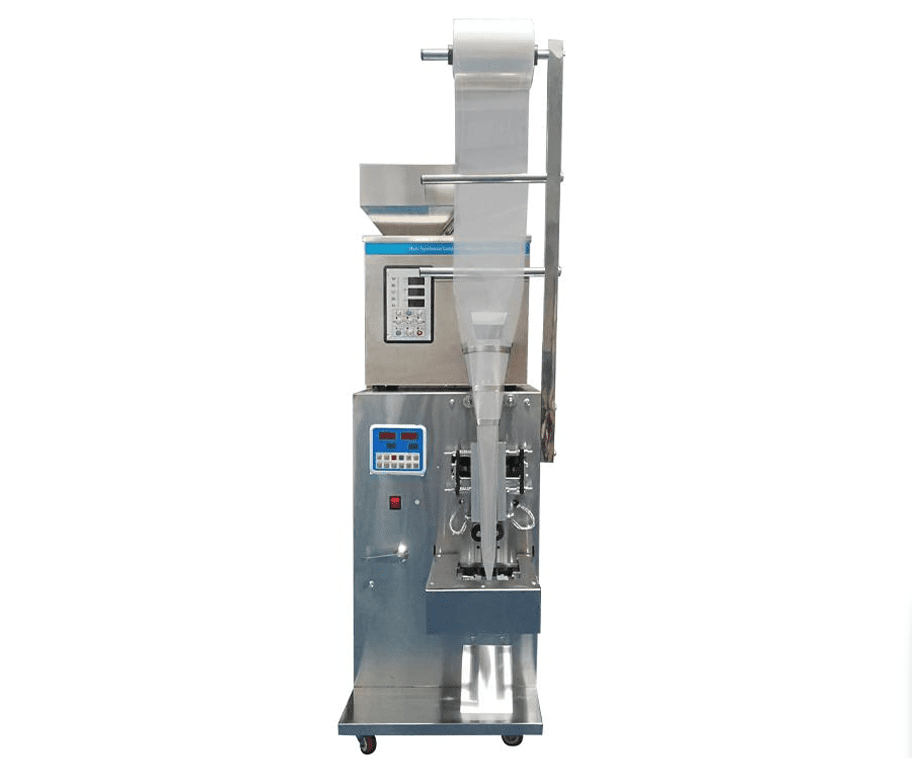
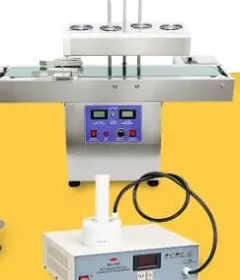
STRUCTURE DIAGRAM
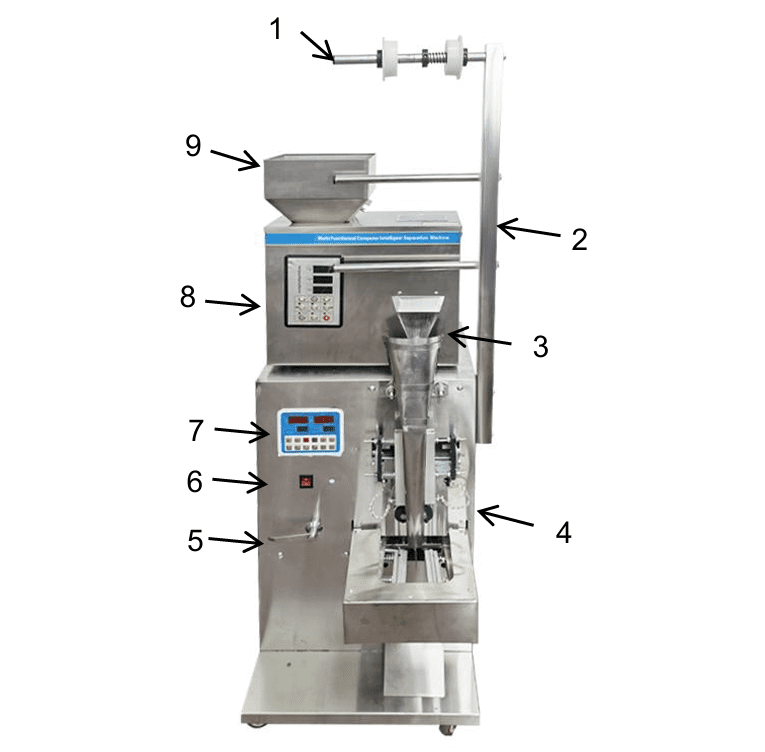
Components in the image
- Reel = Reel
- Fixed Mount = Fixed Support
- Outlet = Exit
- Film Sealing Machine = Film Sealing Machine
- Handle = Handle
- Power Switch = Power Switch
- Control Panel = Control Panel
- Powder Filling Machine = Powder Filling Machine
- Hopper = Hopper
COMPONENTS
| Parts | arl-200 | arl-1000 |
|---|---|---|
| Powder Filling Machine | ×1 | ×1 |
| Film Sealing Machine | ×1 | ×1 |
| Open-end wrench (10 mm) | ×1 | ×1 |
| Open-end wrench (14 mm) | ×1 | ×1 |
| Power Cable | ×2 | ×2 |
| Signal Cable | ×1 | ×1 |
| User Manual | ×2 | ×2 |
| Fixed Support | ×1 | ×1 |
| Stainless Steel Tube | ×2 | ×2 |
| Galvanized pipe | ×1 | ×1 |
| Deflector | ×2 | ×2 |
| Stop Collar | ×3 | ×3 |
| Flat Gasket | ×1 | ×1 |
| Spring | ×1 | ×1 |
OPERATING INSTRUCTIONS (ASSEMBLY)
- Remove the installed screws. Install the fixed bracket and secure it with the screws you just removed, as shown.
[IMAGE: Installing the fixed support] - Install the galvanized pipe and stainless steel pipes into the square tubes successively as shown.
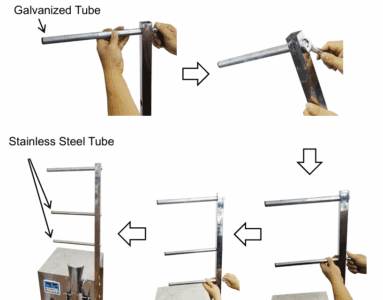
[IMAGE: Pipe Installation] · Galvanized Tube = Galvanized Tube · Stainless Steel Tube = Stainless Steel Tube
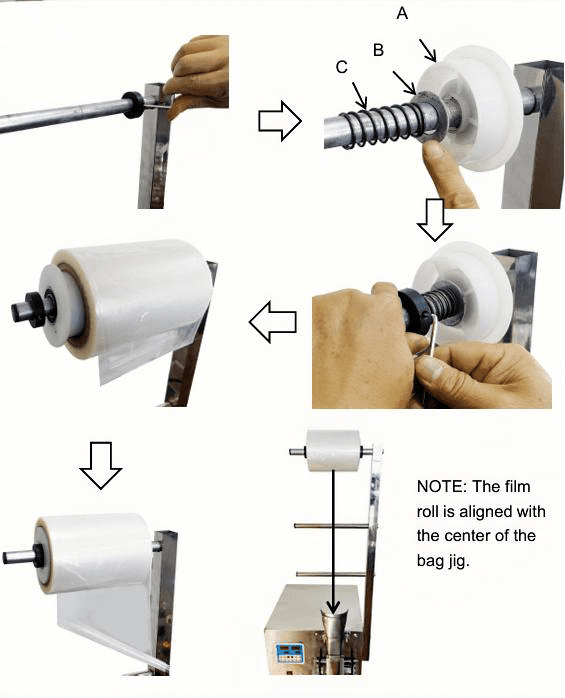
- Install the first stop collar. Then, install the deflector (A), gasket (B), and spring (C) in order. Install the second stop collar and press the spring. Then, install the film roll and the second deflector, and lock it with the third stop collar as shown. NOTE: The film roll is aligned with the center of the bag mold.
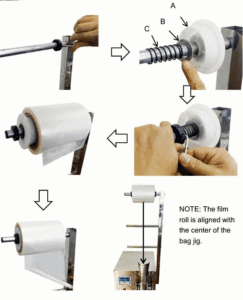
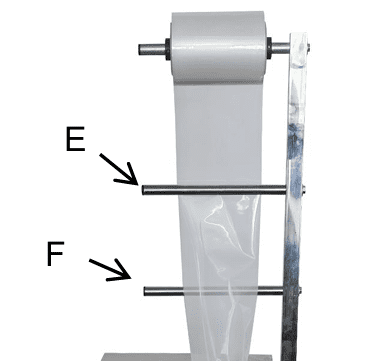
[IMAGE: Installing roll components] · NOTE → Translated NOTE included - The film passes through rods E and F as shown.
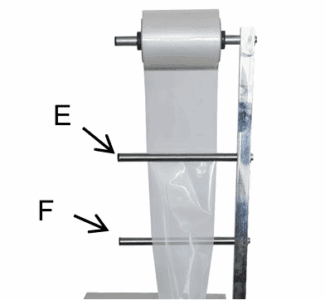
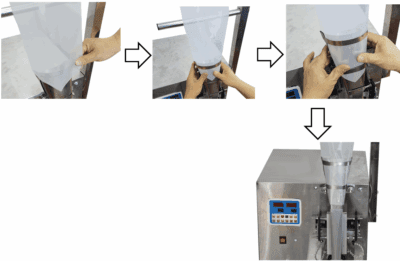
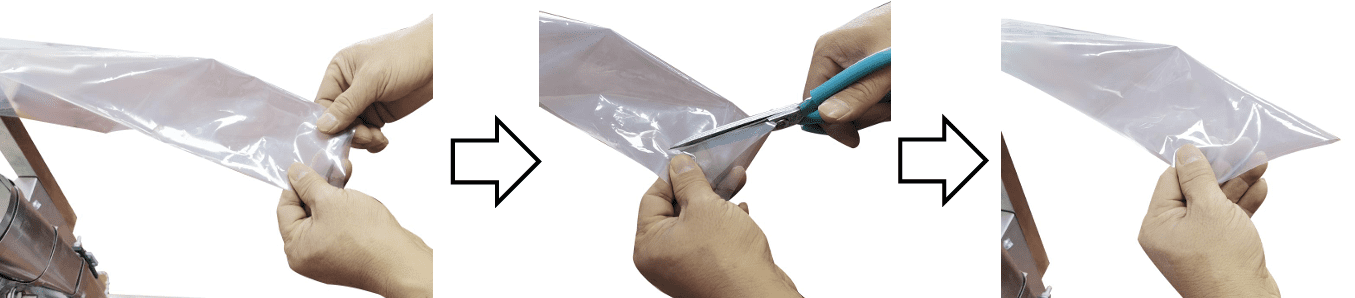
[IMAGE: Passing film through rods] - Pull the film straight and fold it in half lengthwise. Cut a sharp angle at the front end as shown.

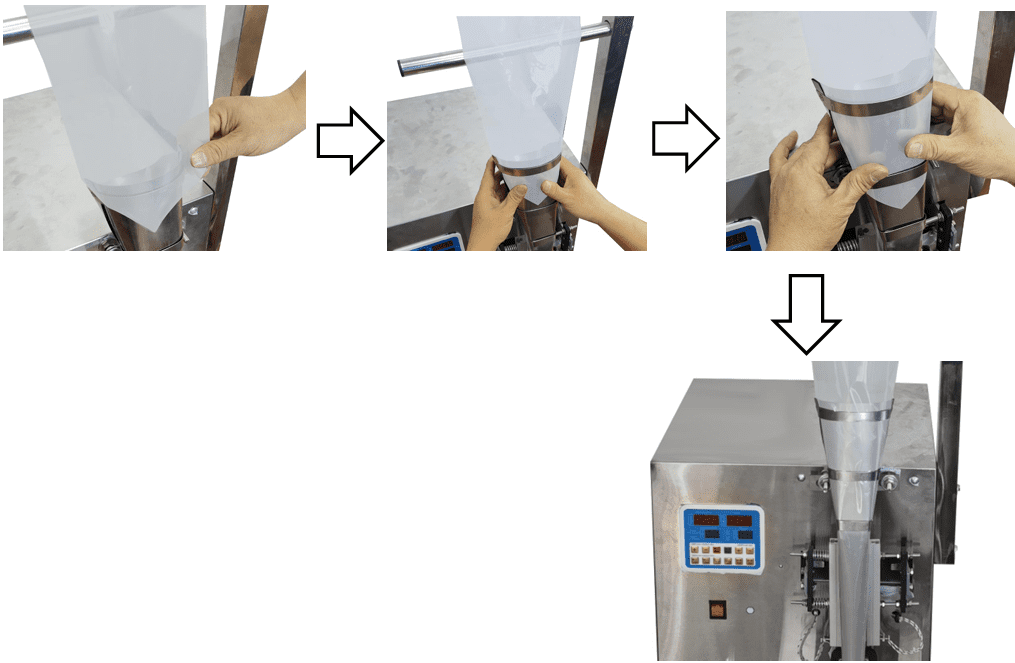
[IMAGE: Film cutting process] - Unfold the film and pass it down into the bag forming mold as shown.
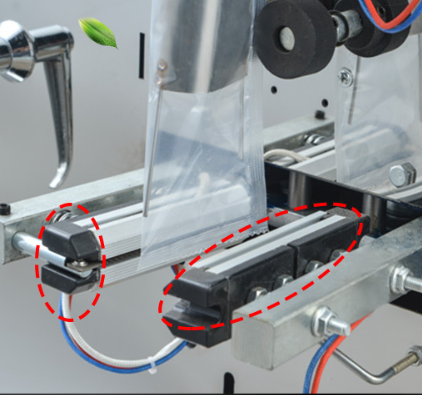
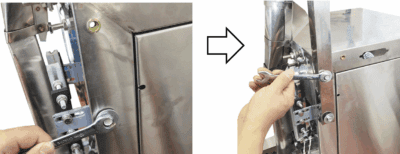
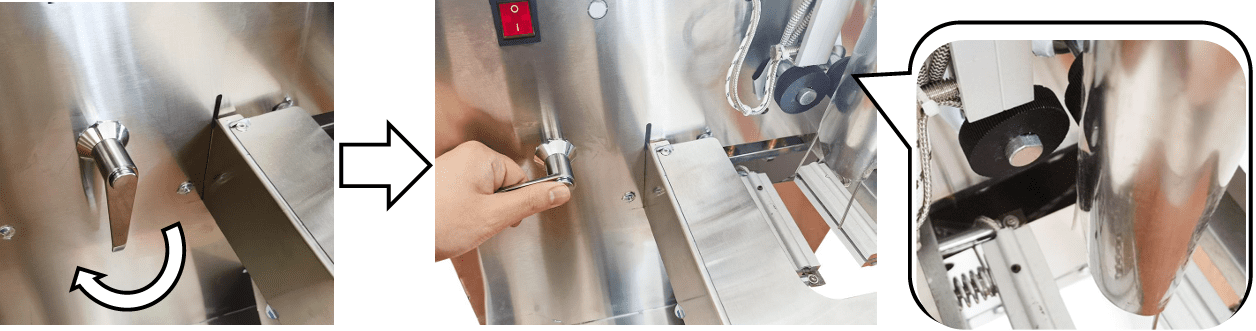
[IMAGE: Film insertion into mold] - Turn the handle 90° clockwise to separate a pair of black rollers.
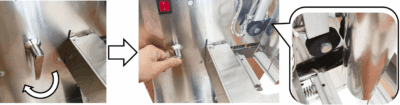
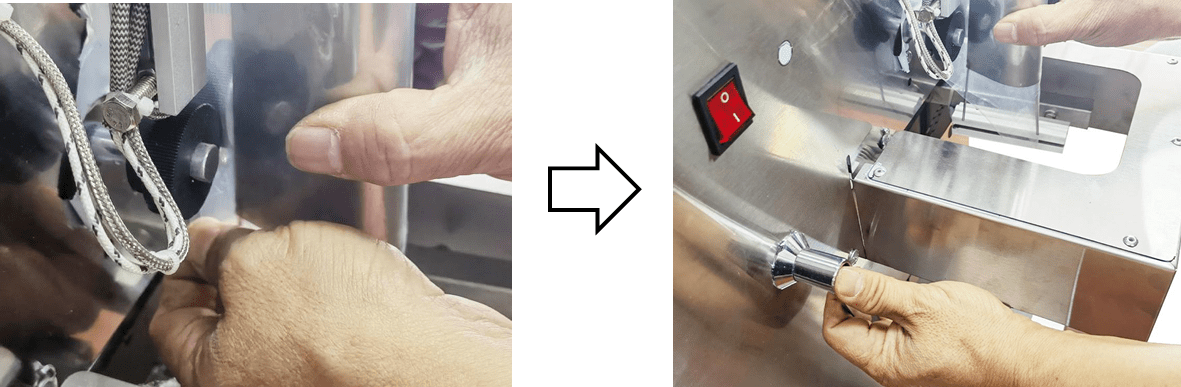
[IMAGE: Roller separation] - Pass the film between the black rollers. Then turn the handle 90° counterclockwise to secure the film.
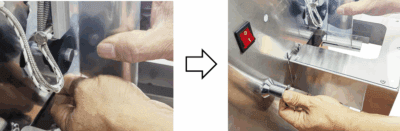
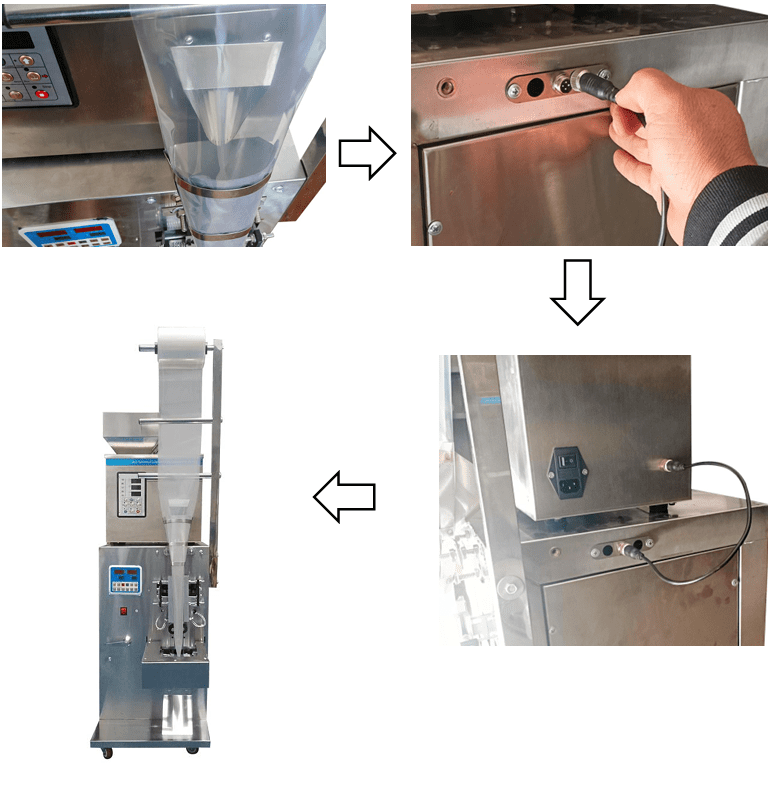
[IMAGE: Holding film with rollers] - Align the two ports on the machine and connect them with the signal cable. Product assembly is complete.

[IMAGE: Final connection of the machines]


CONTROL PANEL
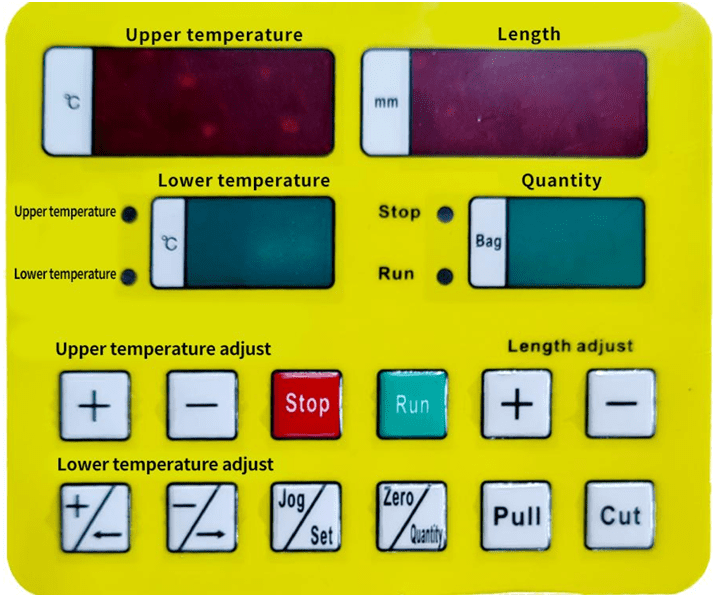
Panel texts
- Upper temperature = Upper temperature
- Lower temperature = Lower temperature
- Length = Longitud
- Quantity = Quantity
- Upper temperature adjust = Upper temperature adjustment
- Lower temperature adjust = Lower temperature adjustment
- Length adjust = Length adjustment
- Stop = Stop · Run = Run · Jog/Set = Manual/Configure
- Zero/Quantity = Zero/Quantity · Pull = Pull · Cut = Cut
Functions
- Upper temperature: vertical sealing.
- Lower temperature: notch sealing.
- Length: established bag length.
- Amount: number of bags sealed.
- “+”/“–” adjustment: modifies temperature or length according to control.
- Arrest: for the machine (red light).
- Execute: when temperature is reached, green light.
- Manual / Configure: manual test / long press for internal functions.
- Pull / Cut: manual stretching or cutting of the bag.
OPERATING INSTRUCTIONS (USE)
- Place both machines in a stable position with power ports aligned.
- Connect the power cord and turn on the switch.
- Set the sealing temperature (recommended) 100–140 °C, according to film material).
- When the temperature reaches the value, make 3–5 empty test bags.
- Turn on both machines to automatically fill and seal bags.
Tip: Adjust the bag length depending on the amount of material to be filled.
MAINTENANCE
- Choose the filling range appropriate to the product. Overweight prohibited (precision scale).
- Keep the machine level and stable; avoid vibrations/impacts.
- After use, clean the material and exterior; store in a dry, ventilated place.
- Clean product and filter after each use.
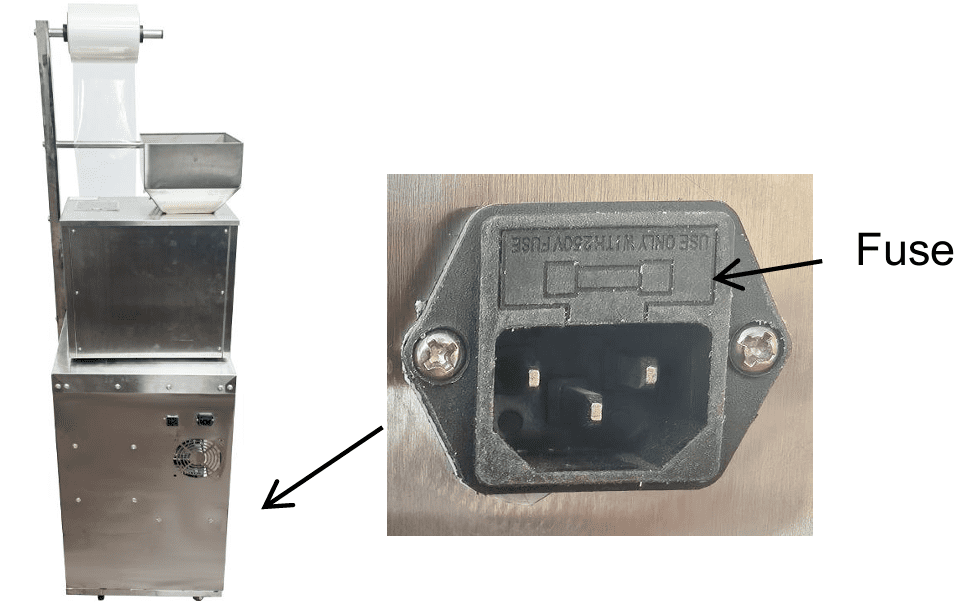
- If the fuse is damaged, replace it as directed.
TROUBLESHOOTING
| Problem | Possible cause | Possible solution |
|---|---|---|
| The product does not work | The power cord is not plugged in properly | Reconnect the power cord |
| The product does not work | Fuse failure | Replace the fuse |
| Bag manufacturing stopped | The film roll is upside down | Reinstall the film roll |
| Bag manufacturing stopped | The signal cable is not plugged in | Reinsert the signal cable |
| The handle did not return | — | Turn the handle back into place |
| The film roll is not insured | — | Reattach the film roll |
| The bag seal is not good | Sealing temperature too low | Set the recommended temperature |
| The bag seal is not good | Sealing temperature too high | Adjust to the recommended temperature |
